logodynamip.jpg (2633 bytes) Setup Example Local WEBcam

DynamIP Forum

Download DynamIP v3.50 Try DIPS - a free service


HOME

Table of Contents

for:

News newspin.gif (26402 Byte)
Reviews
Inventive Users

What is DynamIP?
What is DIPS?
How does it work?
Sample Templates

Requirements
Download

Installation
Uninstall
Setup
Setup Examples
newspin.gif (26402 Byte)
Trouble Shooting
Support
User Manual
Advanced Users

WEBcam newspin.gif (26402 Byte)

NT Service
DIPFTP Client
DUN/RAS log

Meeting Places
Discussion Group
Mailing List

The Tribe
Year 2000 / Y2K

Suggestions


Up
Setup Example Local WEBcam
Setup Example Remote WEBcam
Setup Example WEBcam Sequence

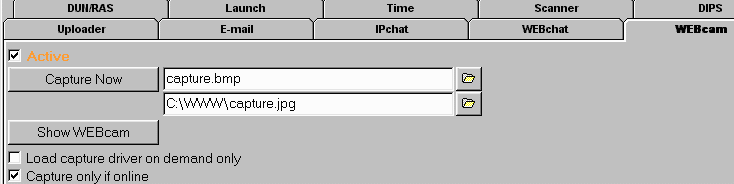
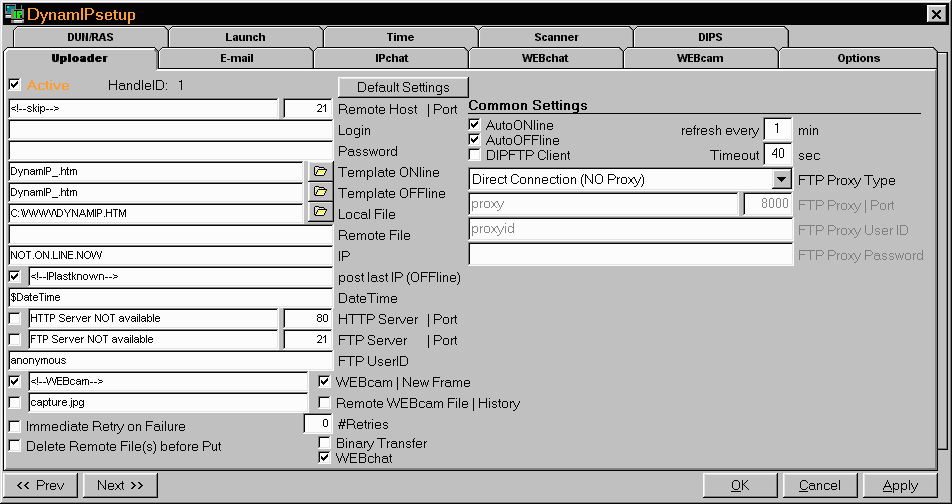
Note: the following is only an example. You need to replace all the sample information with your own information if you want this to work on your own computer!

Please make sure that you have gone through all the steps in How to run a WEBcam site before you continue here!

To run a local WEBcam site you must be running your own local web server. If you wonder how people will ever be able to find your WEBcam site, read up on DIPS at http://postmodem.com/dips-admin/. With DIPS you'll be able to get a permanent URL for your WEBcam site that will always resolve to your local web server whenever you are online! Furthermore, you need the following information:

The root directory of your local website. For this example I will assume that the root directory is C:\WWW.
  1. Choose the menu Setup|WEBcam:

dipwebcamsetuplocal.gif (12048 bytes)

Check the Active box and enter C:\WWW\capture.jpg into the JPEG field. Then you click the OK button to save this information.

  1. Choose the menu Setup|Uploader and enter the following information:
    dipwebcamsetuplocaluploader.gif (26194 bytes)
    The value <!--skip--> in the field Remote Host tells DynamIP not to upload any files using FTP (since all files are stored locally, there is really no need to FTP files to a remote server!). The value C:\WWW\DYNAMIP.HTM in Local File tells DynamIP to store the update file into the root directory of your local web server. Note that the filename in Remote WEBcam File, capture.jpg, must be equal to the setting in Setup|WEBcam (the JPEG file). DynamIP replaces the tag <!--WEBcam--> in the template with an image tag that points to the JPEG file (and that's why DynamIP must know the name of the capture file - the path is ignored, only the filename is important).
  2. Click the OK button, go online, and give it a try.

The above setup will update the WEBcam picture every 1 minute and you should see the updated web page DYNAMIP.HTM and the WEBcam picture capture.jpg in your directory C:\WWW. A sample page is available here.

The DynamIP Uploader can do many more tricks. Check out the detailed setup instructions for the Uploader.


Last modified: March 07, 1999
OFFLINEvisitors since May 1, 1998


for:
Download DynamIP v3.50
Try DIPS - a free service
DynamIP Forum at Delphi
click here to send e-mail
e-mail
cmu_mini.jpg (1302 bytes)cmuspin.gif (39406 bytes) http://www.bigfoot.com/~cmu/
http://www.bigfoot.com/~DynamIP/ to get DynamIP
http://www.bigfoot.com/~DIPSClient/
to get DIPSClient
click the link below to find out whether I'm online or not:
http://postmodem.com/dips/cmu/DYNAMIPCMU.HTM
11MB Free Web Hosting at XOOM! Free
Hosting
xoom.gif (1701 bytes) amazonassociate.gif (2041 bytes)